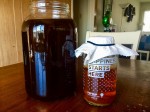
While debates continue on whether kombucha can cure a hangover, boost your health or is simply just a weird tasting tea with no benefits at all, there is one thing you can be sure: it costs a pretty penny. At four to five dollars a bottle in Whole Foods, Ralphs and Ackerman Student Union, an addiction to this fizzy fermented tea drink can quickly drain you of your savings, forcing you to settle for the less complex fruit juice spritzers at Bruin Plate.
However, though it takes over a month, a little research, a few minor kitchen appliances and online instructions, it’s actually possible to brew your own kombucha. And with six full fledged kombucha-holics as roommates, I decided it was time to take on the challenge.
Day 1:
The first step to making kombucha requires making your own SCOBY. Without getting too science-y on you, SCOBY stands for Symbiotic Culture of Bacteria and Yeast. It’s a mixed culture that forms through fermentation at the top of the liquid. Kombucha requires both bacteria and yeast to digest the sugar and cause fermentation, carbonation and the production of probiotic bacteria that is said to be good for digestion. Though it looks like a weird, round, blobby, floating alien substance, it’s very important to the kombucha making process.
The SCOBY blocks air and outside bacterias from affecting the sweet tea while it’s fermenting, protecting it while simultaneously transforming it into the fizzy, sour liquid we know and love. It is possible to buy a SCOBY online, but making your own SCOBY is easier than it sounds. Plus, once you have your SCOBY, you can continue to make jars of kombucha with the same one, as long as you keep it healthy.
Ingredients for a homemade SCOBY:
1 cup of water
2 black tea bags
One bottle of raw, unflavored kombucha
Sugar
To make my SCOBY, I first brewed one cup of black tea. While the water was still hot, I added two tablespoons of sugar to the mix and let it dissolve. Once the tea had cooled to room temperature, I poured the tea into a mason jar and added the contents of a bottle of a pre-purchased kombucha, making sure to include all the yeasty stringy particles at the bottom of the bottle. After covering the top of the jar with a paper towel and a rubber band, I placed it on a shelf in my pantry to ferment, away from direct sunlight.
Day 7:
A week later, a baby SCOBY began forming at the surface of the liquid. It was still very thin and translucent looking, but seemed to be a good sign that my SCOBY was fermenting and forming successfully.
Day 21:
By the end of the third week, the SCOBY was fully formed and looked to be about a 1/2 inch thick. A SCOBY must be at least a 1/4 thick to be used to brew kombucha, so I was off to a good start. At this point, the SCOBY-making part of the kombucha-brewing process is complete, and it was now time to brew my first batch of drinkable kombucha tea.
Ingredients for homemade kombucha tea:
3 1/2 quarts of water
1 cup sugar
8 bags of black tea
2 cups of raw, unflavored store-bought kombucha
Kitchen Tools:
Large pot
1-gallon glass jar or two 2-quart glass jars
Paper towels or tightly woven cloth to cover the jar
Glass bottles or jars for finished tea
Small Funnel
The next step is to brew a huge pot of concentrated tea using the eight tea bags. Just like with the SCOBY, I added the sugar when the tea was still hot and then left the mixture to cool to room temperature. Once the tea was cooled off, I poured it into a large jar along with two cups of store-bought kombucha. With clean hands, I removed my SCOBY from the smaller mason jar and slipped it into the new jar. Finally, I covered the jar with a tightly woven piece of cloth and secured it with a rubberband.


Day 31:
A month from when we first started, the kombucha is ready to be bottled. The tea smells great, sweet and vinegary but not overly so, and the SCOBY looks healthy with no mold in sight. Now that the tea is separated from the air-blocking SCOBY, the kombucha will start to carbonate and will be ready to be cooled in the fridge for drinking within one to three days.
Day 34:
Finally, it is time to taste my kombucha. While my roommates are slightly apprehensive after reading stories about contaminated homebrewed kombucha causing severe illness, my kombucha shows all the known signs of being healthy. A healthy kombucha should not smell putrid or bad and the SCOBY should maintain its pale brownish color, free of any green or black looking mold, though brown strings of yeast are common. My kombucha smells like normal kombucha, not too vinegary and not rotten at all. It looks perfectly carbonated, and is a nice pinkish-clear color, with no indication of mold or spoiling.
Hoping for the best, I toast my roommates and take a sip. Low and behold, it’s delicious! Though I didn’t add any flavorings, it tastes slightly like a pink lady apple, with crisp sweet and sour overtones. It may have taken a few weeks but with six, 16-ounce bottles filling up my fridge for only about five dollars, it’s definitely worth it.
